The search feature is handy for Windows users, and you need to fix it as soon as possible. Thankfully, there are ways to fix File Explorer search not working in Windows 11 and we have explained nine such ways in this article.
Why does the File Explorer Search Stop Working?
The breakdown of the File Explorer search feature can happen for many reasons. In some cases, File Explorer starts malfunctioning due to an internal glitch. Windows uses the search index to run the search feature in the operating system. Damaged search index can trigger the problem. Corrupted Cortana is another reason for File Explorer search not working. Cortana in Windows is used for searching files. In the newer editions, it has been named “Search.” So, if Cortana fails, search in File Explorer will fail too. SearchApp.exe crash can also cause the same issue.
Fix File Explorer Search Not Working in Windows 11
Now when you know the reason why File Explorer search may not be working. Let’s jump into the troubleshooting the issues.
1. Restart the Computer
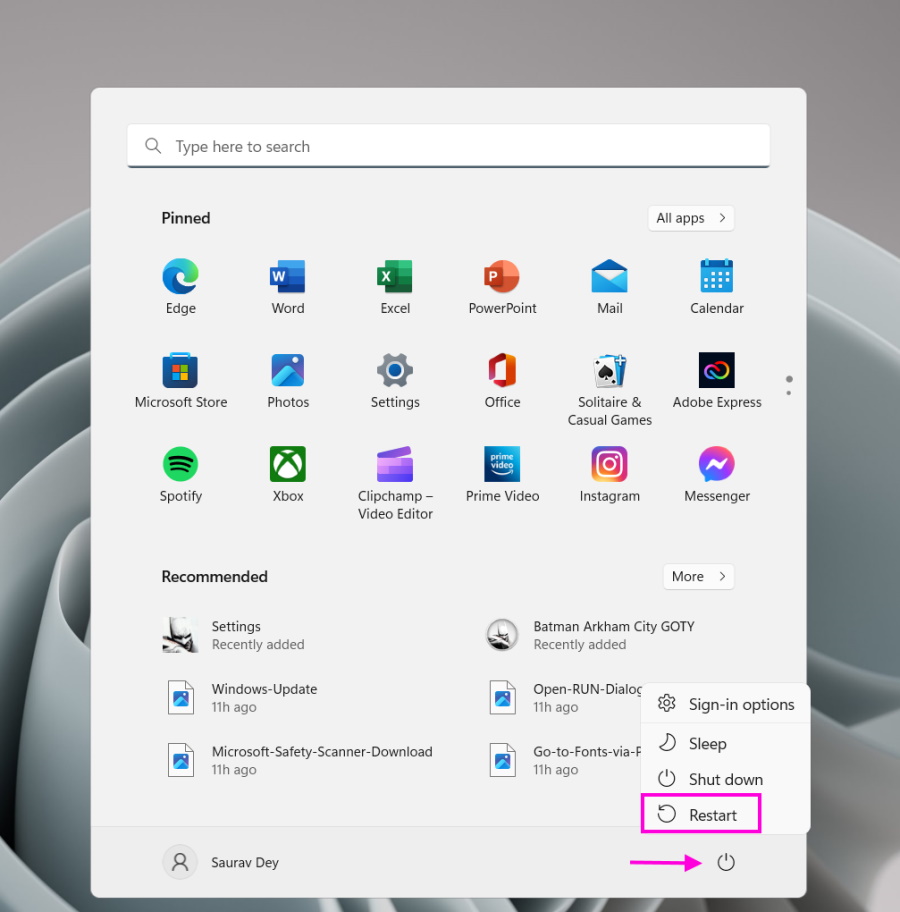
Likely, the search is not working due to a temporary system glitch. When that happens, you simply need to restart your computer to fix it. The same has happened to many users; restarting the computer helped them. So, before jumping to any conclusions, restart your computer. Go to the Start Menu. Click the Power Button and choose the Restart option. Try using the search feature after restarting the computer. If it is working, your work is done. Otherwise, check out the following troubleshooting tips.
2. Restart File Explorer
If restarting the computer doesn’t work, you need to restart File Explorer. Windows search is a part of File Explorer. So, restarting File Explorer might fix the issue.
- Right-click on the “Taskbar” and select Task Manager. You can also launch Task Manager by pressing Ctrl + Shift + Esc or Alt + Ctrl + Del.
- Select Windows Explorer under “Apps” on the Task Manager.
- Click End task on top.
- Alternatively, you can right-click Windows Explorer and select End Task from the drop menu. File Explorer will be stopped momentarily. After it starts again, try searching.
3. Stop Cortana
Cortana is the Windows Virtual Assistant. It is essentially an AI that helps with anything and everything, including search. Cortana searches through verbal communication, which can conflict with the text-based search index. We recommend stopping Cortana if you still haven’t been able to fix the File Explorer search not working on Windows 11.
- Launch Windows Task Manager.
- Select Cortana from the list.
- Click End task. Cortana will be stopped. It won’t start unless you restart the computer. Try using the File Explorer search.
4. Windows Search Service
Windows Search Service is a part of File Explorer. It launches with the initial system startup. If the service doesn’t start automatically, you will face issues with the File Explorer search. So, If you still haven’t been able to make headway, it is time to restart Windows Search Service.
- Press Win + R on the keyboard to launch the RUN dialogue box.
- Type service.msc had hit Enter.
- A UAC prompt may appear; click Yes.
- Scroll down in the Search window and locate Windows Search.
- Right-click Windows Search and select Properties in the context menu.
- In the Properties window, choose the Automatic option in the Startup type menu.
- Select Stop, and click the Start button. After that, launch File Explorer and try using the search function again.
5. File Explorer Search Options
File Explorer has a dedicated search option where you can enable the Always Search File Names and Contents option. You can locate this option in the properties, and allowing this option can make the File Explorer search function again.
- Press Win + E to launch File Explorer.
- Click the Three-Dot Icon at the top and open Options.
- Navigate to Search.
- Enable the Always search file names and contents option.
- Lastly, click OK to confirm. After enabling the option, try using File Explorer. It may work slowly as it searches for file names and contents.
6. File Indexing
File indexing is an integral part of Windows search. If it doesn’t work correctly, search results will come empty. So, if the same is happening on your computer, you must manually allow file indexing.
- Press Win + E to launch File Explorer on Windows.
- Select a Folder of your choice.
- Click the Three-Dot Icon at the top and select Properties from the drop menu.
- Choose the General tab and select Advanced.
- Check the box beside the Allow files on this drive to have contents indexed in addition to file properties option.
- Lastly, click OK to complete the process.
7. Search & Indexing Troubleshooter
Windows has troubleshooters to fix all types of system issues. It has a dedicated troubleshooter for Search and Indexing files in Windows. Here are the steps to run it.
- Press Win + I to launch Windows Settings.
- Select System on the left side of the panel.
- Scroll down and choose the Troubleshoot tile.
- After that, click Other troubleshooters.
- Finally, click Run right next to the Search and Indexing troubleshooter. It will launch the troubleshooter. Wait for the troubleshooter to finish its work.
8. Rebuild Search Index
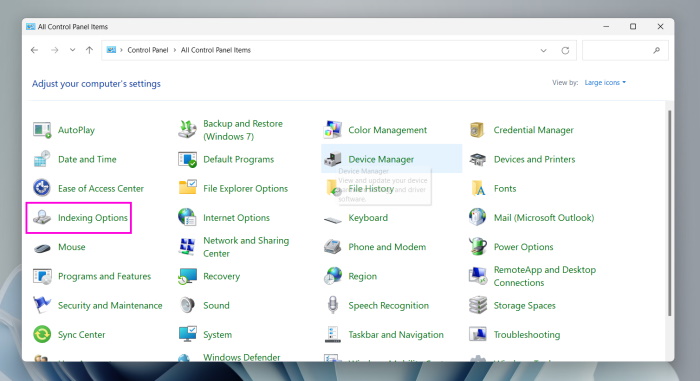
The search index is an integral part of the search feature on Windows; without it, the Search function won’t work. If your computer has an old search index, the problem could originate from there. You will occasionally get inaccurate search results. But you can fix it by rebuilding the search index. It is pretty easy; check out the steps below.
- Open Control Panel.
- Select Indexing Options.
- Click Advanced in the Indexing options panel.
- Click the Rebuild option.
- Finally, click OK to confirm. This should fix the File Explorer search not working on your Windows 11 computer. After executing the process, try using the search again.
9. Windows Update
It is always necessary to keep Windows OS updated. Otherwise, your computer will fall victim to numerous bugs and glitches. It is even possible the File Explorer search is acting up as you haven’t installed the latest Windows update, where Microsoft introduced a few necessary patches. So, if you haven’t updated Windows in a while, we recommend you do it immediately.
- Press Win + I to open Windows Settings.
- Click Windows Update on the left side of the settings window.
- Click Check for updates. Windows will locate all the pending updates, and you will get the Download and Install option. New updates will start installing. Afterward, you will be asked to restart your computer. After the restart, try using the search feature again. It should function again.
Enjoy Using File Explorer Search Function Again
A standard Windows PC contains thousands of files, and it is impossible to locate each manually when needed. You also can’t sort out files and folders by tagging them on Windows, a convenient feature available on the macOS. So, without a doubt, the File Explorer search function bares a lot of importance for Windows users. Sadly, it is not a fail-proof feature. The search feature is known to fail or not respond from time to time, which creates a state of emergency for Windows users. In such cases, use the tips and tricks discussed in the article to fix the File Explorer search not working in Windows 11.
Also Read: How to Fix File Explorer Tabs Not Showing in Windows 11


